![]()
![]()
Go to the Workflow toolbar and click PMA ![]() .
.
Use the Patient Mini-Archive (PMA) to:
· Filter relevant information in a mini-archive (patient portfolio, prior studies, reports, sticky notes, order information).
· Place additional studies or series on screen.
· Re-arrange existing data.
· Load additional studies or series.
|
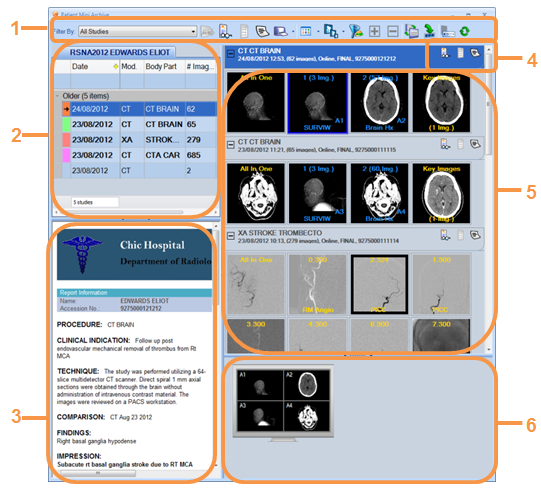
1 |
The study in context is selected in the List of Studies pane. |
|
2 |
List of Studies pane Provides the list of patient studies, allowing you to review the entire patient's portfolio. The List of Studies is grouped per period. Note: The periods are configurable. |
|
3 |
Report Preview Displays a preview of the report of the selected study. |
|
4 |
Study-level toolbar Displays information about the study. Indicates if the study has order information, reports, or sticky notes. Queried-only studies can also be loaded. |
|
5 |
Series Thumbnails pane Displays the series thumbnails for each loaded or queried study. |
|
6 |
Mini-Monitors pane Displays the current layout and data for the monitors. You can drag series thumbnails directly to the Mini-Monitors pane to modify and organize data. Monitors are labeled alphabetically. You can also right-click on the mini-monitors to modify the Viewer layout. |
Use List of Studies to control which studies are shown in the Series Thumbnail pane. Click the series icon in Series Thumbnails and drag the icon to a location in Mini-Monitors.
The studies listed in the List of Studies pane are labeled with colors corresponding to the Current/Prior annotations in the display.
The List of Studies pane provides the following columns: Study Description, Accession Number, Study Time, Study Availability, Study Status, # of Series, Orders, Sticky Notes, Has Key Images, and Has Significant Series. You can filter the displayed studies by entering any value in the line below the table headers.
The patient studies are grouped by periods, which indicate how recently a study was taken.
Right-clicking the header area will add a column. Select Field Chooser and select a column from the list. You can drag the column to the List of Studies pane.
Right-clicking the column header and selecting Remove Column removes the column.
1. In the Series Thumbnails pane, click View Type  > Report View.
2. Click a study in the List of Studies pane. The most recent applicable report for the study displays in the right pane (Series Thumbnails).
To view information dynamically, place the cursor on a series. A tool tip shows the title of each DICOM tag and the complete tag value.
To view DICOM information constantly click View Type > Text View.
Note: View Type > Text View only provides additional DICOM tags, which are configurable.
1. In the Series Thumbnails pane, click Change Icon Size ![]() .
.
2. Select:
· Small—best for studies with many series, such as MR.
· Standard—the default size.
· Large—best for studies with few series, such as CR or CT.
You can change the PMA layout to show all the panes horizontally or vertically. The PMA layout is saved between sessions/logins.
To change the layout, click Change View Layout ![]() .
.
Click and drag the pane border to dynamically change the position of the border up/down or left/right.
Click the pane border once to move the pane to the edge of the window.
The PMA has another display mode, which is a limited view of the PMA. The PMA Strip Mode presents all the patient studies in separate tabs.
· Place the mouse cursor over or click on any tab to show the study's series thumbnails.
· Drag any series directly to the Viewer.
· Additional series information is available in a tooltip. Place the mouse cursor on the relevant series thumbnail to display the tooltip.
· Click the relevant icon on the left pane to open the report, the order information, and the sticky note of the study.
· The annotation color of the thumbnails changes to blue while the series is displayed in the Viewer.
Note: By default, the body part DICOM tag is displayed on the study tab. If no body part is available for the study, then the study description tag is displayed. You can configure both tags in Application Settings.
You can load an entire study from the List of Studies pane or Series Thumbnails pane:
· Double-click the study.
· Select the study and click Load Study ![]() .
.
· Right-click the study and select Load, Load Key Images, or Load Significant Series.
Click once on the study in the left pane or right-click and select Explore. The study’s series shows in the Series Thumbnails pane.To load a queried-only series:
· Use any of the loading methods for an entire study (above).
· Drag the series to the Mini-Monitors pane.
· Drag the series to the Viewer.
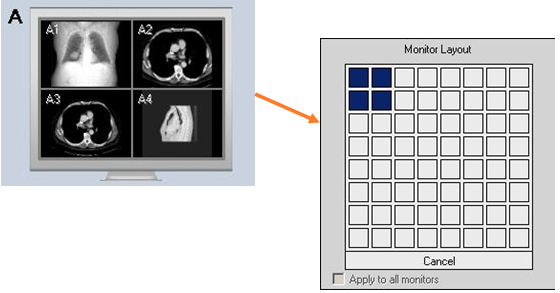
Double-click on a group to place it in the first available group display area. If no spot is available, the group is placed at the top left corner, replacing the currently displayed group.
1. Right-click the Mini-Monitor pane.
2. Drag the mouse cursor over the squares to define the layout.