![]()
![]()
You can automatically remove the scanner bed from three-dimensional images (VolR or MIP).
NOTE: If the study includes two-dimensional images, the scanner bed remains intact.
1. Load a study with three-dimensional images into a viewbox application such as 3D Data, Vessel Analysis, or Volume Matching.
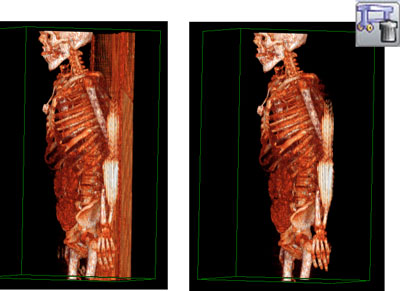
2. Locate an image that displays the scanner bed.
3. From the toolbar, click Automatic Scanner Bed Removal ![]() .
.
4. The image is processed and displays without the scanner bed.
NOTE: The Automatic Scanner Bed Removal tool equates the scanner bed with tissue. After removal, the scanner bed is listed in the Tissue menu. You can select or deselect the scanner bed in the list to show or hide the scanner bed.
1. Apply Automatic Scanner Bed Removal.
2. In the menu toolbar, select Tissue --> Show Tissue --> Scanner Bed. The scanner bed is displayed in the image.
3. To hide the scanner bed, select Tissue --> Hide Tissue --> Scanner Bed. The scanner bed is concealed.
When you apply Automatically Remove Bone ![]() , the Automatic Scanner Bed Removal is also applied in tandem.
, the Automatic Scanner Bed Removal is also applied in tandem.
See this topic: