![]()
![]()
When you mark a SIG, the system automatically retains the marker.
The system saves SIG images when you confirm the case.
Most of the image parameters, such as pan or enhance, are saved as part of the SIG image. The zoom image parameter is not saved.
2. Apply annotations or measurements, or manipulate the image as needed.
3. Click Done ![]() or select File --> Done.
or select File --> Done.
The system saves the SIG markers and most of the image parameters, excluding zoom.
The SIG images are now listed in the Archive Explorer.
When marking full group/series, the same group/series will appear twice, once without Significant Series indication and once with Significant Series.
Use the Has Significant Series column in the Archive Explorer to view and organize series containing SIG images. See Locating Studies with SIG Images.
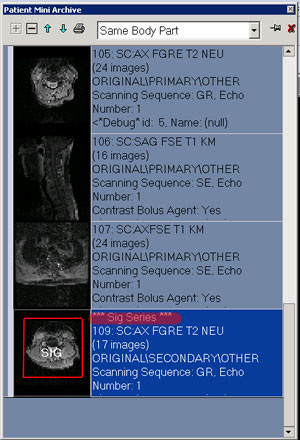
After you mark a series, you can see the identity of the new series in the PMA and the Replace With annotations.
In the PMA, you will see the Significant Series identified with the yellow text SIG sign on the image and a Sig Series note in the details.
When you drag a SIG image from PMA into the viewbox, you will see a SIG annotation in the upper left of the viewbox.
When you use the arrow keys to navigate between series, the navigation includes Significant Series.
All Significant Series are part of the All-in-one series. SIG images may appear twice.