![]()
![]()
Use the protocol to automatically segment major arteries and generate minor arteries accessible through the reference 2D/3D images.
Important: Cage removal is mandatory for cardiac scans. Bone removal is optional but recommended for body scans.
1. Click New Vessel > Automatic Protocol (Coronary Tree or Torso/Runoff).
The algorithm segments the major vessels and displays the vessels on the 3D image. The layout changes to examine one major vessel. The vessels are purple on the reference images.
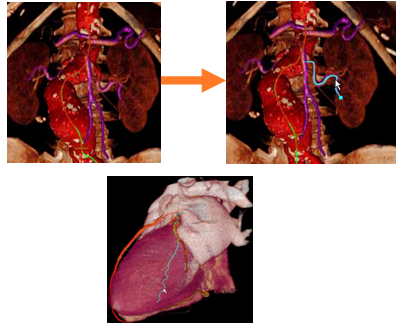
2. Place the mouse cursor over a purple vessel to view the suggested vessel path. The suggested path is cyan (blue).
3. Right-click the suggested path and select one of the options:
· Accept—accepts entire suggested path as a vessel.
· Accept As—accepts the entire suggested path with a name from a predefined list.
Note: You can edit the predefined list through the central configuration.
· Accept up to marker—accepts the portion of the suggested path up to the blue marker near the mouse cursor.
Note: Holding the the mouse cursor over a defined vessel produces suggestions for vessels branching from the defined vessel, if applicable.
The vessel is made active and shown in the panoramic image. You can edit the vessel with the correction tools in the Vessel tab.
Right-clicking a defined vessel in the 3D image opens the menu.
You can rename a defined vessel.
1. Right-click the defined vessel or click the Vessel drop-down menu.
2. Select the name in the predefined list.
3. Edit the name from the central configuration.
You can extend a defined vessel distally or proximally. The operation depends on the location of the cursor in the 2D/3D image.
Right-click the vessel and select Extend or click Extend Vessel.
· Automatic path suggestions are shown by purple regions. Right-clicking a purple region opens a menu with options for accepting the suggested extensions.
· Left-clicking outside the purple regions extends the vessel up to the click point.
Note: This mode of extention is applicable for vessels defined using the other protocols, such as general, aorta, and neck.
Note: Press the Shift key while clicking to maintain the mode for additional seed points.
Important: Click Undo extend to cancel the vessel extension results.
1. On a defined vessel, move the active vessel cut point to the bifurcation point.
2. Click Branch to create a copy of the defined vessel up to the bifurcation point.
3. Click Extend Vessel to track the desired branch.
1. Change the vessel (edit or truncate).
2. Click Recalculate Contours to update visualization and automatic measurements.
3. Click Recalculate Vessel to re-center the vessel and update the contours based on the new centerline.
Show/Hide vessel graphics—toggles the vessel centerlines and contours in all images.
Show/Hide vessel overlays—covers the MPR image with a transparent, color-coded overlay of vessels.
· Purple—regions with identified vessels.
· Orange—vessels already defined.
Note: Overlay colors and opacity are editable from the central configuration.
Show/Hide vessel suggestions—disable/enable automatic vessel path suggestions and purple regions in 2D/3D images.
Note: Pressing Ctrl temporarily disables suggestions during operation of other modes.
Show/Hide data—toggles between vessel-only and full data in VolR image.