![]()
![]()
You can use predefined spinal markings for Cervical (C1-C7), Thoracic (T1-T12), Sacral (S1-S5) and Lumbar (L1-L5) annotations. You can use the Application Settings window to configure:
The vertebrae to select (for example, only every second or third vertebra [Skip value]).
Including vertebra annotations or disk annotations in the Spine Labeling dialog box.
The first label selected when you launch Spine Labeling.
The default value for the Spread Range.
The default direction for spine labeling (top down or bottom up).
The Apply on all Groups check box default label.
To add a spine label:
1. From the Viewer, select an image.
2. In the Graphics tab of the toolbar, click Spine Labeling ![]() .
.
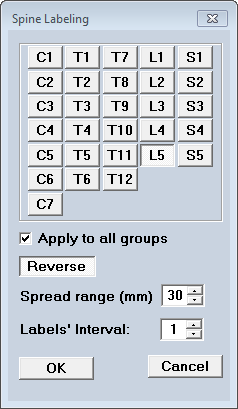
The Spine Labeling dialog box appears. It displays disks or vertebrae, depending on how it was configured.
Mark the middle of the vertebra in the sagittal images so they will be properly displayed in the axial and coronary images.
You can use other modes, such as zoom or pan, while implementing Spine Labeling.
You can mark the spine labels on any image in the active group only.
Axial images can display only one label. If you place a second label on the image, the first label is deleted and only the new label is displayed.
Sagittal and coronal images can display multiple labels, but each label can be used once only. If you add T2 to an image that already has a T2 label, the first label will be updated and replaced by the new T2 label.
4. Click on the image where the annotations should be placed.
The spinal marking is automatically incremented. After the last marking in the series, the next applicable series starts. For example, the annotation after T12 is L1.
NOTE: By default, the spine labeling marked on a specific series is automatically displayed on other applicable series after the labeling process is complete. If required, deselect the Apply on all groups check box.
5. Click Reverse to mark the vertebrae in reverse (for example when marking the Lumbar spines).
6. If required, change the spread range.
On sagittal and coronal images, spread range determines how far spine annotations marked on one slice should apply to far away slices of the same group. The system copies the markers above and below the set thresholds. On the axial slices, only the nearest slice is marked.
7. Click OK.
Spine labels can be moved or deleted, and the color can be changed. Any changes affect only the selected label.
NOTE: Click Cancel to cancel the current spine labeling session.
You can determine the deltas between the spine labels displayed on the spinal image.
Click the up and down arrows on the Labels Interval field and select an interval.