![]()
![]()
Using the Layout Tab in the Toolbar
Use the Layout tab of the toolbar to define application layouts.
1. In the Layout tab , click the drop-down menu of the Define Layout icon ![]() .
.
2. Select Define Layout. In the Define Layout window, drag the mouse over the grid to highlight the desired layout. click to complete the selection.
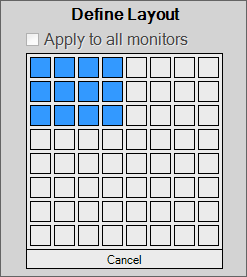
3. Check the 'Apply to all monitors' option if you want the same layout to apply to multiple monitors. Otherwise, the newly defined layout applies only to the active monitor.
4. To save the newly defined layout for future use, select Save as New Layout from the Define Layout drop-down menu.
An icon is added to the Application Layout ribbon in the toolbar to reflect the newly defined layout ![]() .
.
5. Right-click the various layout icons in the Layout tab and use the options of the drop-down menu to organize the Layout tab according to your preferences. You can remove an icon, move icons to left or to the right and reset the layout icons.

Using Application Settings
Use Applications Settings to define which layout will be represented by the different layout icons in the Layout tab of the Layout ribbon.
1. Open the Application Settings window.
2. From the left pane, select Viewing Settings.
3. Click Viewer Pre-defined Layout
The layout buttons appear on the right hand side..
4. Click Edit for each option you want to configure.
The Define Layout window appears.
5. Drag the mouse over the grid to highlight the desired layout. click to complete the selection.
The new layout is stored and displayed on the main window.
6. Click OK.